Why convertible breathable fishing waders are the best choice for backcountry fishing trips

Do you like to fish places where you might not see another angler all day long? If the answer is yes, then you may want to consider the benefits of backcountry angling

We’re really into the backcountry style of fishing, and are going to discuss why breathable fishing waders, and specifically the convertible wader style, provide several advantages for backcountry anglers, making them essential gear for your next backcountry fishing trip.  

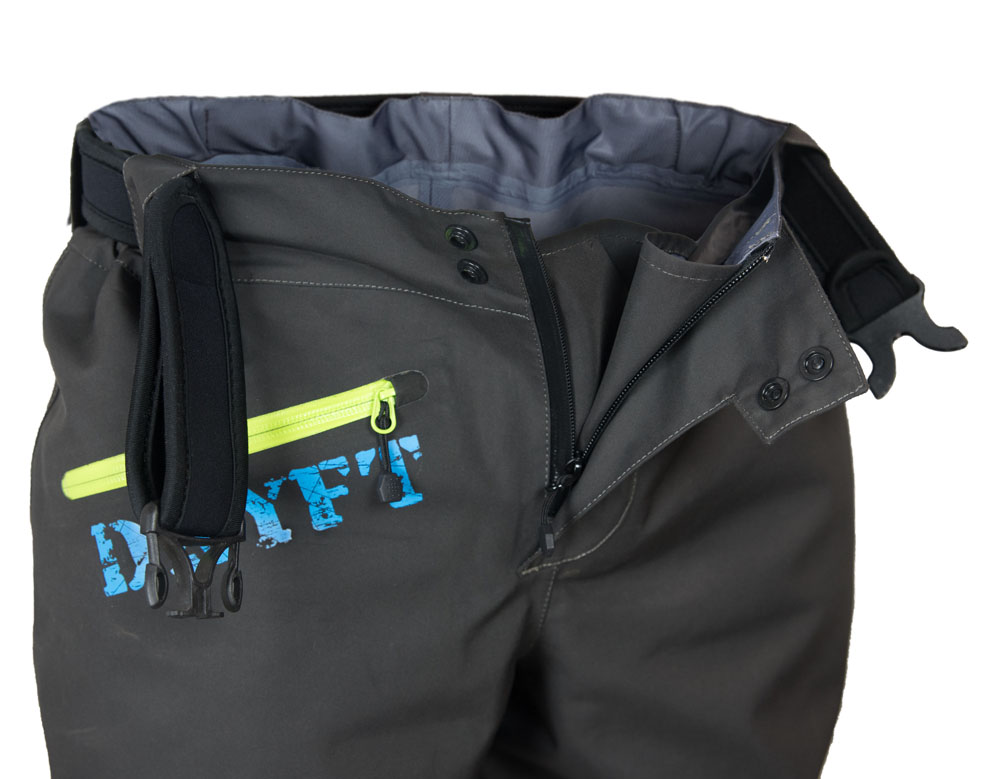
What are convertible top fishing waders? 

Convertible waders are simply where the upper portion of the wader is constructed on a sliding system, to be able to be unsnapped from the top end position and pushed down to the users waist. Usually they incorporate snaps or buckles, to allow the top to be secured in the upper position. Our new Session Lite Convertible Waders use a magnetic snap to make this function effortless. 

Session Lite Convertible Breathable fishing waders being used in the backcountry

Convertible waders increase mobility and comfort through breathability and function

Advantages of convertible straps and stockingfoot wader design

Waders with a convertible style top will increase your comfort by allowing you to drop the top when you’re warm and hiking, and pull it back up if you get cool or need to cross a deep stretch of water. Waders designed with an easy snap method, like the magnetic snaps on the Session Lite Convertible waders, are a necessity. We recommend a stockingfoot design for active fishing, as you can wear wading boots designed for hiking that will be comfortable all day long. Also, lightweight stockingfoot waders will roll up and fit in a backpack for a long hike in. 

High quality fishing wader neoprene stockingfeet

How do breathable fishing waders actually work?
Breathable fishing waders are constructed of a multi layer fabric that allows air, but not water, to pass through.  A waterproof membrane is sandwiched between layers of durable fabric, giving the fabrics the ability to pass air through but keep water out. This is a huge advantage to any active angler, and most quality waders are built using this technology now. 

Benefits of breathable material
The main benefits to breathable fishing waders is that it helps prevent overheating and sweating. Keep in mind that getting hot and sweating can still happen while wearing them! It just significantly helps compared to older styles of non breathable waders. 

Fly fishing in the backcountry

Comfort and mobility of waders designed for backcountry fishing
The importance of using the proper waders for backcountry angling cannot be stressed enough. If you want to enjoy your day, be comfortable and mobile then you will want to use the right waders. Lightweight, breathable, and convertible systems will help make the most of your trip.  

We hope you enjoyed these tips, and hope you enjoy lots of happy and comfortable fishing this season!

Session Lite Convertible Breathable fishing waders being used in the backcountry

Why you should be maintaining the DWR coating on your fishing waders and jacket

What is DWR?
The waterproof breathable fabric used on waders and jackets helps to keep you comfortable by allowing warm air to escape outwards and breathe through the membrane, while simultaneously keeping water out.  The DWR coating is what makes water bead up and run off. You may have noticed that over time water will bead up less, and instead the outer layer may begin to soak up or saturate with water. This is often referred to as ‘wetting out’, which doesn’t mean the gear is leaking, but instead means the outer layer is saturated and inhibiting the inner membrane from breathing.  When this happens it can leave damp spots of condensation on the users under layers.

In order for air to pass through the outer layer of fabric there can’t be a saturated layer of water on the outer layer, which is where the DWR coating comes into play. If the outer layer is saturated, it essentially voids the ability of the membrane to do its job, and the warm air won’t be able to escape. This will make the user warmer, sweatier, and more likely to get that damp clammy feeling. 

The trick is to maintain the outer layer of fabric by keeping it clean and using a DWR reviver regularly so that water beads up and sheds off.  

We recommend cleaning and reviving the DWR coating on your waders and jackets regularly, usually 1-2 times per year is adequate (of course depending on use). We recommend Revivex by Gearaid as it uses a simple spray on and let dry method. Start by cleaning your waders or jacket with a simple scrub down or with Pro Cleaner, and then spray with Revivex Durable Water Repellent. Let it dry and you’ll be good to go. 

Then go have some happy and comfortable fishing!

Dry your waders to avoid mildew damage

You’ve probably read or heard recommendations to dry your waders between uses, for comfort and to avoid mildew damage. You might be wondering why this is so important? The main reason is to avoid mildew growing on the inside which can damage the fabric and seam tape. Some amount of condensation will always be present on the inside of waterproof breathable waders, simply because of how the fabric functions. The material used on breathable waders works in this way; there are thousands of tiny holes, that are too small for moisture (water) to fit through but are big enough for vapor or air to move through. This allows air to flow through, hence making them breathable, but keeps water from passing through. Because the human body naturally passes moisture out through the skin, a bit of condensation build up throughout the legs, feet, knees and on the ankles is normal. If you’re interested we have more information about condensation here.

How should you dry your waders?

This is the easy part. Simply hang your waders up to dry in a warm well ventilated area, allow them to dry out completely between uses, and you’ll be ready for your next trip with dry and good smelling waders. In most situations we recommend just leaving the waders right side out, and hanging them by the hanging loop or clip the front buckle ends together and hang them up somewhere warm and well ventilated.

We’ve found that the only time we need to turn the waders inside to dry the inside is after we go for an inadvertent swim. If and when you fall in the river and fill your waders up, you will need to turn them inside out to fully drain and dry the inside before storing them. And remember to always wear your wading belt for safety!

The bottom line is that it pays to dry your waders to avoid mildew damage. Mildew is not only stinky and gross (and possibly harmful to your health), but it actually damages waterproof breathable fabrics and seam tape making them more likely to wear out and need to be replaced faster.

Do you waders have funk that you’d like to get rid of? Gearaid makes great cleaning products designed to work with our waterproof breathable fabrics.

We’ll leave you with these example photos below of what to avoid! The black spots shown over the fabric and seam tape is all black mildew, doing what it does best to damage and ruin these waders. So don’t ball your waders up and leave them on the floor or in the back of your truck!

mildew growth on fishing waders
example of mildew growing on seam tape on fishing waders
mildew damage on breathable waders

How to repair pinholes or tears in breathable waders

finished patch on breathable fishing waders

How to find a leak and repair your breathable waders

Use these instructions and photo examples below to find and repair pinholes, tears, or holes in your breathable waders.

Step 1:

If there is a visible tear or hole then skip this step and proceed to step 2.  To find a leak, first carefully visually inspect the area and see if you can see any tiny holes or tears. Often times you’ll be able to find the spot just by looking closely.  If there is no visible hole or tear, then the alcohol method works well to find it.

To do this turn the waders inside out, and spray or rub a small amount of rubbing alcohol over the area you think is leaking. Then flip the waders back right side out and look for the wet spot. Any leaks will show as a damp spot on the outer side of the fabric. Mark this with masking tape or a marking pen, dry the waders and then move on to the repair. 

Step 2:

Usually a small tear or leak can be completely repaired with just a little Aquaseal. Once you locate the leak, the easiest repair is to coat one or both sides with Aquaseal. A tip for using Aquaseal is to heat the bottle just a bit in warm water, which makes it much easier to use. To spread it, use a flat squeegee (a piece of cardstock or a business card works well) to form a thin layer over the affected area. 

We recommend using some masking tape to mask off the area around the tear or pinhole to keep it contained to just the area around the tear.

For a durable wader repair using the material supplied in the repair kit, usually for a larger tear or rip, use a piece of the fabric supplied to cover the tear. Cut a piece of fabric to the relative size of the tear allowing it to overlap. Then Aquaseal over the tear, stick the fabric down and seal the edges of the fabric with Aquaseal.

This will create a permanent patch. Before doing any Aquaseal repair mask off the area with some masking tape, scotch tape, or any tape to help keep the Aquaseal in a neat area over the repair. Make sure to remove the tape after 10-15 minutes while the Aquaseal is still wet. 

The seam tape that is included in the repair kit is heat activated. This is a bit more advanced, and there is potential for damage since you’ll be applying heat to an area of the fabric. For at home, an old iron set to medium high temp can work well to ‘iron on’ a bit of seam tape to the inside of the waders. This probably won’t be necessary and is not normally required. However this can seal the inside on a small tear, pinhole, or seam nicely when done correctly. This backing can also be done with gear repair tape like Tenacious tape.

Step 3:

Get back to fishing. 

Note: Also recommend carrying Aquaseal UV on trips. It cures within 20-30 seconds in direct or indirect sunlight (UV) and can save the day in a pinch.

Photo examples of patching a tear.

In these photo examples we will show you steps to locate and repair breathable waders. This example shows an abrasion in the breathable wader fabric, that is repaired using Aquaseal and a fabric patch.

1 – 3. Photos showing the hole. This tear is visible on the exterior and interior. Photo 3 shows what the alcohol test looks like. For non visible pinholes it will just look like a wet spot.

tear in breathable waders
tear in breathable waders inside
tear in breathable waders alcohol test

4. Apply backing on the inside. In this photo we used heat sealed seam tape, essentially applied with a hand held iron. In place of seam tape you can use a gear repair tape like Tenacious tape, or skip this step altogether. If skipping, we recommend putting some regular tape on the inside over the hole to prevent Aquaseal from squeezing through in the next step.

Patching breathable fishing waders

5 & 6. Apply Aquaseal. We usually cut a small piece of cardboard stock from the packaging to apply. Apply Aquaseal and smooth over the hole, making sure it completely fills and covers the hole.

Aquaseal for patching waders

7. Measure and cut a piece of fabric from the supplied repair kit. Tenacious tape can be used in place of wader fabric in this step as well. Just be sure to cut the tape patch oversized enough so that there is at least 1/2 inch extra on all sides to stick to the fabric, and not over glue.

cut a patch to size

8. Apply a thin layer of Aquaseal to the backside of the fabric piece. Again use a small piece of cardboard or a business card as a tool.

9. Stick it down and let it dry. If the edges are lifting up you can use some masking tape to hold it down temporarily. So long as there isn’t a lot of extra glue coming out the edges the tape can be removed once it is dry.

applying patch to breathable fishing waders

10. To make a clean looking patch, surround the patch and any areas you don’t want to Aquaseal over with masking tape. Then apply Aquaseal around the edges of the patch. Be sure to remove the tape while the Aquseal is still wet. Otherwise it will be permanent. This step is completely optional.

masking off patch

11. The finished patch. This patch may not be pretty but is very durable.

finished patch on breathable fishing waders

How to safely clean your breathable waders

Why wash your waders?

First off, you may be wondering why you would want to wash your waders. There are several reasons why you should wash your waders. Keeping them clean and free of dirt, oils, fish slime, etc will prolong the life of the materials and help your waders last longer. Washing them will also help get some of the funk out, so they won’t be quite so pungent stinking up the car on the drive to the river.

We get questions from time to time on the best way to wash waders, so here are some tips.

Wash your waders by hand

We recommend hand washing your waders with some Revivex Pro Cleaner (or mild non scented soap) in cold or lukewarm water using a soft rag. A mild scrub down should work to clean as much of the dirt that will come off by hand and keep the waterproof fabric repelling water like it should. Do not use harsh detergents, cleaners or scented laundry detergents. Any cleaner that is formulated for outdoor fabrics, including for Gore-Tex, is best and safe to use as long as it can be applied through a hand wash. Nikwax, Gearaid, and others make cleaners that are specifically designed to be safe for outdoor fabrics such as those used on our waders. Keep it simple and use Gearaid Revivex Pro Cleaner.

Hang dry until completely dry.

If desired use some DWR spray reviver on them. Nikwax and GearAid (maker of Aquaseal) make spray on DWR reviving applications for use after cleaning. The GearAid ReviveX is a good product that does a great job of reinvigorating DWR coatings. You will want to clean up the waders as much as possible (hand wash) before using it and then just spray it on when the waders are wet or dry. Let it cure for 24 hours before use.

We don’t recommend machine washing waders and when it comes to using the dryer we just say no. Our reasons are that we don’t like the possible abrasion and catching or bunching that could possibly occur during the wash cycle (this sort of depends on the machine type), and also don’t like to soak the inside seams with water. Never put waders in the dryer as the heat can damage the seam tape.

Once your waders are all washed up just hang them to dry and then store in a cool dry place.

ReviveX Pro Cleaner - Gearaid wader cleaning soap

DRYFT Session Wading Pants – River to Town


Breathable wader care tips – how to take care of your waders (and jackets)

So you just picked up some new breathable fishing waders, or you’ve had them for a while, and you want to make sure you get the most possible use out of them? You came to the right place to learn how to take care of your fishing waders. Doing just a few things will help prolong the life and performance of them.

Heads up: All of these tips apply to waterproof breathable jackets as well. 

Drying your waders between uses

One of the main things you can do to prolong the life of your waders is dry them thoroughly, inside and out, between uses. Wet and damp waders stuffed in the trunk of your car or dumped on the garage floor tend to grow mildew, which breaks down materials inside and out.

Always hang dry your waders after each use, and not only will you avoid breakdown of materials but the wader funk won’t turn your head on a swivel next time you go to put them on. If there is any moisture from condensation on the inside it’s important to dry the inside as well. This is usually accomplished just by hanging them right side out in a cool dry place. In the winter time hanging them in a furnace room, or near a de-humidifier to dry is a good idea. Otherwise a cool, dry place with airflow works just fine.

hanging waders to dry

Wash and treat your waders with a DWR Reviver

How to wash your waders

We recommend hand washing your waders with some Revivex Pro Cleaner, or a mild soap, in cold or lukewarm water using a soft rag. This should work to clean as much of the dirt that will come off by hand and keep the waterproof fabric repelling water like it should.  Hang dry until completely dry and then if desired use some DWR spray ReviveX on them. Nikwax and GearAid (maker of Aquaseal) make spray on DWR reviving applications for use after cleaning. The GearAid ReviveX Durable Water Repellent is a good product that does a great job of reinvigorating DWR coatings. You will want to clean up the waders as much as possible (hand wash) before using it and then just spray it on the surface fabric. ReviveX can be applied when the waders or jacket are wet or dry. Let it cure for 24 hours before use. 

We don’t recommend machine washing waders. Our reasons are that we don’t like the possible abrasion and catching or bunching that could possibly occur during the cycle (this sort of depends on the machine type), and also don’t like to soak the inside seams with water.

Zipper care

Keep all zippers, especially waterproof models, clean and free of any dirt, oils, fishing line or other debris. Foreign matter caught in the zipper can result in damage which may not be covered under warranty. Keep it clean and never force a stuck zipper. If it sticks gently back off in the opposite direction if possible, then clean and lube the entire zipper thoroughly before using it again. We highly recommend using zipper protectants and lubricants such as Zipper Lubricant Stick and Zipper Cleaner + Lubricant to keep your zippers performing as they should for years to come. Use the snap at the top (if applicable) to take stress off and keep it from pulling apart while wearing.

Transporting waders safely

When transporting waders in luggage or just back and forth during fishing trips, the safest way to transport is to roll them loosely from the feet up and pack them at the top of your bag with heavier items under them. If you have a waterproof zip front model, it is very important to unzip all the way before rolling or packing them. If the zipper is zipped and then folded it can create a crease that can cause the zipper to fail.

Those are the foundations of wader care and will help prolong the life and performance of your fishing waders.

Session wading pants stock update

DRYFT Session waist high wading pant waders fly detail

The new Session pants that we added to the DRYFT lineup for spring 2017 were a hit, and we started selling out of them last month.

Because of this excellent response from our awesome customers and such high demand we are planning on bringing them back into the shop later this fall. Look for all sizes, plus size small, to be available in late November 2017.

Want to receive stock updates? Sign up here.